How to Install a Ring Doorbell Without an Existing Doorbell: A Complete Guide
Installing a Ring Doorbell without an existing wired doorbell is easier than you might think. With battery-powered options, you can now enjoy the security and convenience of a Ring Video Doorbell, even if your home doesn’t have pre-installed wiring. The beauty of this process is its simplicity—you don’t need to be a tech expert or have any fancy tools. In this article, we’ll walk you through the process, step by step, and provide insights to help you get the most out of your new device.
Why Install a Ring Doorbell Without Existing Wiring?
Not all homes come with an existing doorbell, and even if they do, running new wires can be tricky and expensive. Luckily, Ring Doorbells don’t require any hardwiring when using their battery-powered models. This makes installation flexible—you can place your doorbell wherever it works best for you, whether it’s at your front door, a side entrance, or even the back gate.
As someone who had to install my Ring Doorbell without a wired connection, I was a bit nervous at first. But trust me, it’s a straightforward process that anyone can handle, even without prior DIY experience.
Getting Started: Charge the Battery
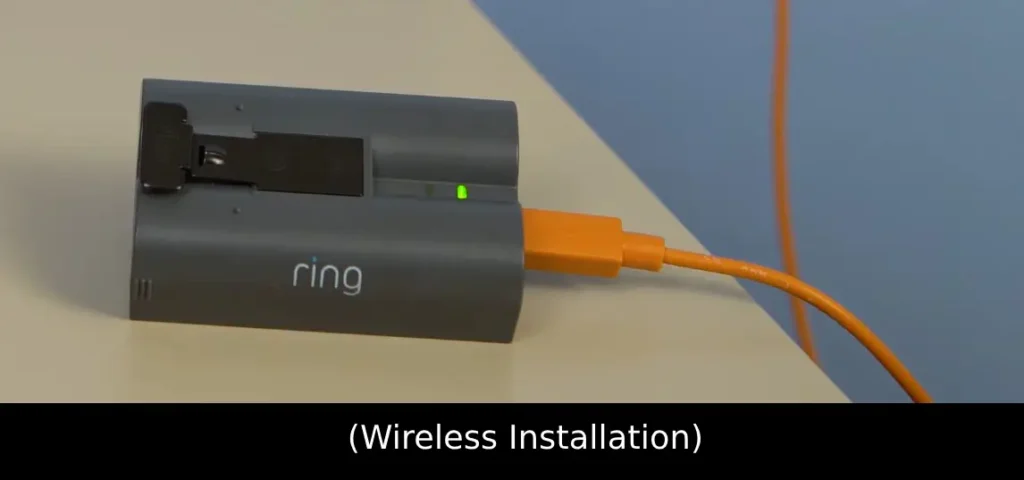
The first thing you’ll need to do is fully charge your Ring Doorbell’s battery. This is crucial because, without power, the doorbell won’t operate. Depending on your usage, the battery typically lasts about 6 months, so you don’t have to worry about frequent charging. Plus, having a second battery on hand means you’ll never experience downtime during recharges.
Steps to Charge the Battery:
- Remove the battery from the bottom of the Ring Doorbell.
- Plug the battery into a power source using the included orange USB cable.
- Wait for the light on the battery to turn green, indicating it’s fully charged.
- Insert the battery back into your Ring device.
Now that your battery is charged and ready, you can start the installation process.
Step-by-Step Guide: Installing Your Ring Doorbell (Wireless)

Once the battery is charged, you’re ready to mount the doorbell. Follow these steps for a smooth installation:
1. Set Up the Ring App
Before mounting the device, download the Ring app on your phone or tablet and create an account if you haven’t done so already. The app is your command center for controlling all the features of the doorbell, so setting it up first is essential.
- After downloading the app, open it and tap “Set up a Device.”
- Choose “Doorbell” from the list of device options.
- Follow the on-screen instructions to complete the setup. You’ll be prompted to scan a QR code located on the packaging or the back of the doorbell itself.
Pro Tip: It’s a good idea to set everything up in the app before physically mounting the doorbell, as this allows you to test the connection and functionality without having to dismount the device later.
2. Line Up the Mounting Bracket
Once the device is ready in the app, the next step is to mount it. The mounting bracket holds the doorbell in place, and this part of the process is the same whether you’re installing a Ring Video Doorbell (1st or 2nd generation), Ring Doorbell 2, or the Ring Doorbell 3 and 3 Plus models. The trick here is positioning.
- Use the included level tool to line up the bracket properly. The tool helps you ensure that the bracket is straight, so your doorbell doesn’t look crooked after installation.
- Hold the bracket at chest height—around 4 feet off the ground is ideal.
- Mark the positions of the mounting holes with a pencil. This is particularly important if you’re drilling into stucco, concrete, or brick.
3. Drill the Mounting Holes
If you’re installing the Ring Doorbell on stucco, brick, or concrete, you’ll need to drill pilot holes and insert plastic anchors (included in the box) before attaching the screws. A hammer may be needed to secure the anchors in place.
- If you’re mounting on wood or vinyl, you can skip the anchors and just use the screws provided.
This part can feel a bit daunting, especially if you’ve never used a drill before. I was hesitant too, but taking it slow and steady will make sure you don’t damage anything. Remember, patience is key!
4. Place the Doorbell on the Mounting Bracket
With the bracket in place, it’s time to attach the doorbell itself. Align the device with the mounting bracket and snap it into place. Don’t be afraid to use a little force—the doorbell is designed to fit snugly for security.
Once it’s mounted, insert the security screws at the bottom of the device to keep it securely attached. The special tool included in your Ring Doorbell box will make this a breeze.

Installing Ring Doorbell Without an Existing Doorbell (WIRED)
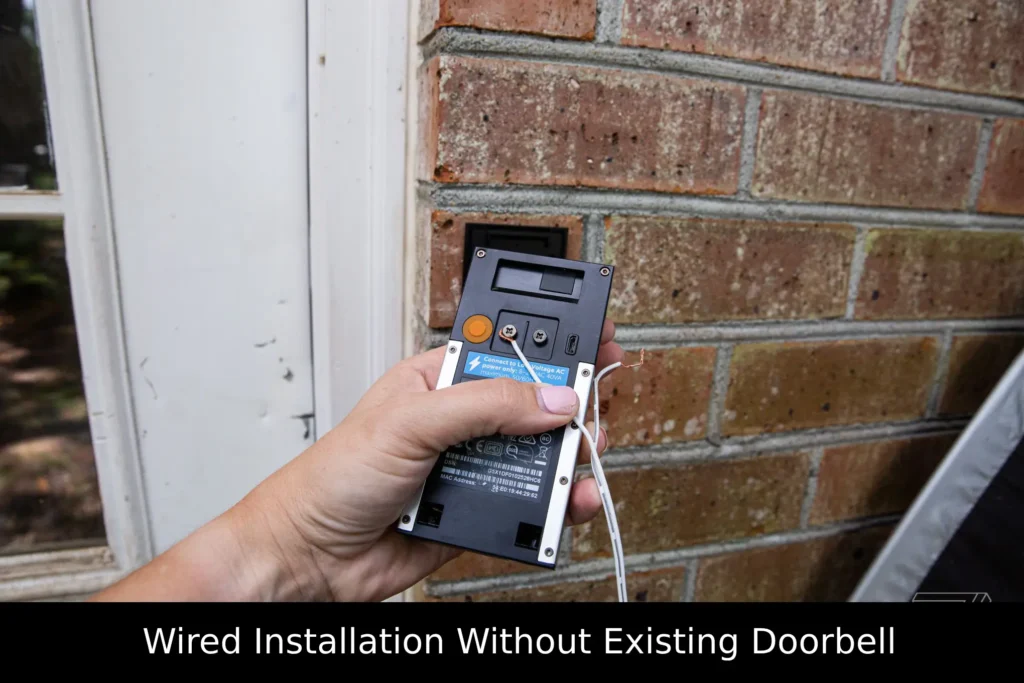
If you prefer a wired setup for continuous power, installing a wired Ring Doorbell without an existing doorbell involves connecting the device directly to a transformer. While this option requires some electrical work, it’s ideal if you don’t want to deal with recharging batteries and want a consistent power source.
Here’s how to install a wired Ring Doorbell if your home doesn’t already have doorbell wiring:
1. Get a Compatible Transformer
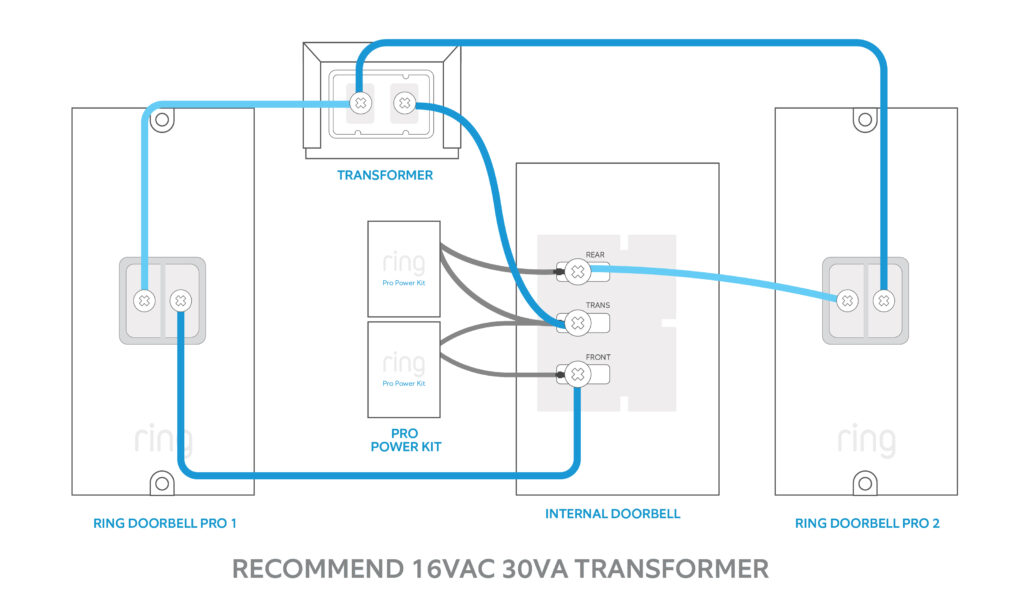
Since there’s no existing doorbell wiring, you’ll need a transformer to supply power to your Ring Doorbell. Look for a transformer with an output of 16-24 volts AC and 30 VA to ensure it works with your device.
2. Install the Transformer
The transformer needs to be wired into your home’s electrical system. It’s often installed near the main electrical panel or in a utility closet. If you’re not comfortable with electrical work, this is a step where professional assistance may be necessary.
- Turn off the power at the breaker before starting.
- Connect the transformer to a dedicated electrical circuit, making sure the voltage matches Ring’s requirements.
3. Run Wiring to the Doorbell Location
Once the transformer is installed, you’ll need to run wires from the transformer to the location where you’ll mount the doorbell. You can run the wires through walls, using conduit if necessary, to protect them from damage.
- Use 18-gauge wire, which is commonly used for low-voltage systems like doorbells.
- Drill holes and run the wires through the exterior wall to the spot where you’ll install the doorbell.
4. Connect the Wires to the Doorbell
With the wiring in place, you can now connect the wires to the Ring Doorbell. The back of the doorbell has terminals for connecting the wires. Attach the positive and negative wires from the transformer to the appropriate terminals on the doorbell.
- Loosen the terminal screws, insert the wires, and tighten the screws to secure the connection.
5. Mount the Doorbell
Once the wiring is complete, you can mount the doorbell using the included screws. If you’re attaching the doorbell to brick, concrete, or stucco, use the provided plastic anchors to secure it in place.
6. Power On and Test the Doorbell
After the doorbell is installed, turn the power back on at the breaker. Return to the Ring app to finish connecting the doorbell to your Wi-Fi network. You can now configure your settings and begin using your Ring Doorbell with a continuous power source, no battery required!

Also Read: Vivint Doorbell Not Ringing Inside the House? Here’s How to Fix It!
Finishing Touches: Connecting to Wi-Fi and Customizing Settings
Now that your doorbell is mounted, return to the Ring app to finalize the setup. The app will guide you through connecting the doorbell to your Wi-Fi network. Once the doorbell is connected, you can customize settings such as motion detection sensitivity, notification preferences, and video recording settings.
Ring’s app also allows you to integrate the doorbell with other smart home devices, such as Amazon Alexa or Google Home. Pairing your Ring with a smart assistant lets you use voice commands for added convenience.
Pro Tip: One thing I noticed after my first few days of using the doorbell is that motion detection can sometimes be too sensitive, especially if you live near a busy street or have a lot of foot traffic. Adjusting the detection zone and sensitivity will help you avoid unnecessary alerts.
The Benefits of Installing a Ring Doorbell Without Wiring
One of the standout benefits of using a battery-powered Ring Doorbell is the flexibility it offers. You’re not limited by wiring, which means you can place it in areas where a traditional wired doorbell wouldn’t work. Plus, with features like two-way audio and real-time notifications, you’re always connected to what’s happening at your front door, whether you’re home or not.
Additionally, the lack of wiring makes this an easy DIY project for renters or those who may move frequently, as there’s no need to make permanent changes to the property.
You can also read the full process of wired installation on Ring’s Official Page with Diagrams for Better Understanding.
The Benefits of a Wired vs. Wireless Installation
Both wired and wireless installations have their benefits:
- Wireless Doorbell: This is ideal for homes without existing doorbell wiring. It’s easy to install, requires no professional help, and offers flexibility in placement. The battery life is long, but you’ll need to recharge it every 6 months or so.
- Wired Doorbell: While it involves more work upfront, a wired installation means you’ll never have to worry about charging a battery. It’s perfect for homeowners who want uninterrupted service and a hardwired power source.
Final Thoughts: A Smooth and Rewarding Experience
Installing a Ring Doorbell without an existing doorbell is an approachable task that provides peace of mind and enhances your home’s security. Whether you’re new to DIY projects or a seasoned pro, following these steps will ensure a successful installation.
I remember feeling a bit intimidated by the prospect of drilling into my wall and setting up a smart device. But once I got started, I realized how intuitive and straightforward the process is. And now, having the ability to monitor my front door from anywhere gives me a sense of security that’s worth the effort.
So, if you’re considering adding a Ring Doorbell to your home, don’t hesitate. The process is simple, and the benefits are immense!

